
The Kodak Retina IIIc Saga Continues…
The Kodak Retina IIIc is not a perfect camera by any means, but its strengths far outweigh its few flaws. Its remarkably compact size, exceptional lens quality, and innovative features combine to make it a standout choice for photographers who truly appreciate the unique charm and subtle challenges of vintage gear. Sure, the infamous cocking rack can be a persistent headache, and tracking down a reliable, well-functioning example can sometimes be a gamble. But when you get it just right—whether through careful, patient selection or, in my case, a little bit of creative parts-swapping—the Retina IIIc becomes a camera that genuinely rewards you with every single shot, making the whole journey well worth it.
The anticipation of receiving a new to me camera in the mail is a feeling that resonates deeply with any photography enthusiast. After the trials and tribulations recounted in my previous article about purchasing a Kodak Retina IIIc on eBay, I was cautiously optimistic when another Retina IIIc arrived in the mail. My last order took a grueling three weeks to arrive, so when this one showed up in just five days, I was nothing short of astonished. The speed of delivery felt like a small victory, a promising start to what I hoped would be a better experience with this iconic folding camera.
There’s something undeniably thrilling about unboxing a vintage camera, especially one as storied as the Kodak Retina IIIc. It’s not just a piece of equipment; it’s a tactile connection to photographic history, a vessel of potential adventures wrapped in a sleek, compact body. As I carefully unwrapped the camera from its packaging and slid it out of its well-worn leather case, I couldn’t help but feel a rush of excitement. Life, I’ve come to realize, is not like a box of chocolates, as Forrest Gump famously quipped. It’s more like an eBay order, you truly never know what you’re going to get. Sometimes, that unpredictability leads to a nightmare; other times, it delivers something even better than you’d hoped.
As I held the Retina IIIc in my hands, I noticed something immediately; the previous owner had etched their personal information into the top plate. It was a minor imperfection, a testament to the camera’s trajectory through time and human hands before reaching my possession. My primary concern, however, wasn’t the cosmetic imperfections but the condition of the cocking rack—a notorious weak point in the Retina series, including the IIa, IIc, IIIc, IIIC, and IB models. My previous Retina IIIc had arrived with a faulty cocking rack, rendering it nearly unusable, and I was determined not to repeat that disappointment. If this one’s cocking rack was also defective, I was ready to swear off Kodak Retinas for good.
To my relief, the cocking rack was in mint condition. I spent some time meticulously inspecting the camera, testing its mechanical functions, and familiarizing myself with its quirks. The shutter fired smoothly, the aperture ring clicked with satisfying precision, and the film advance lever, uniquely located on the bottom of the camera, operated as it should. But, as with any vintage purchase, there were imperfections. I noticed a small spot on the front lens element, and the built-in light meter was sluggish, struggling to respond accurately to changes in light. These issues, while not deal breakers, meant the camera wasn’t quite ready for action.
In my previous article, I had mentioned the possibility of using my first Retina IIIc as a parts body if its issues proved insurmountable. That’s exactly what I ended up doing. The first camera, despite its faulty cocking rack, had a pristine front lens element, a fully functional light meter, and an unmarred top plate. With a bit of careful disassembly and some tinkering, I swapped these components onto the new camera. The result? One fully functional, almost perfect Kodak Retina IIIc, albeit with mismatched serial numbers.
For some, mismatched serial numbers might be a dealbreaker, a blemish on the camera’s collectible value. But I’m not a collector, I’m a photographer that uses my cameras. My goal isn’t to display this Retina IIIc on a shelf; it’s to take it out into the world, capture moments, and tell stories through its lens. With the best parts from both cameras combined, I now had a folding camera that was not only functional but also a joy to use.
Last week, I took my newly restored Retina IIIc to green valley park here in Payson, AZ to test its capabilities. As I framed shots and adjusted settings, an older gentleman walking his dog approached me. He watched me for a moment before asking, with genuine curiosity, “How are you able to take pictures if you’re blind?”
It was a question I’ve heard before, and in that moment, a dozen responses flashed through my mind, some witty, some defensive. Instead, I opted for a simple analogy: “If you’d been doing something for 40 years, would you stop just because you couldn’t see anymore?” He paused, nodded thoughtfully, and said, “That’s a great point.” With a smile, he continued on his walk, his dog trotting happily beside him.
That interaction stuck with me. Photography, for me, is more than just seeing through a viewfinder. It’s about muscle memory, intuition, and a deep understanding of the craft honed over decades. The Retina IIIc, with its unique design and tactile controls, complements this approach perfectly.
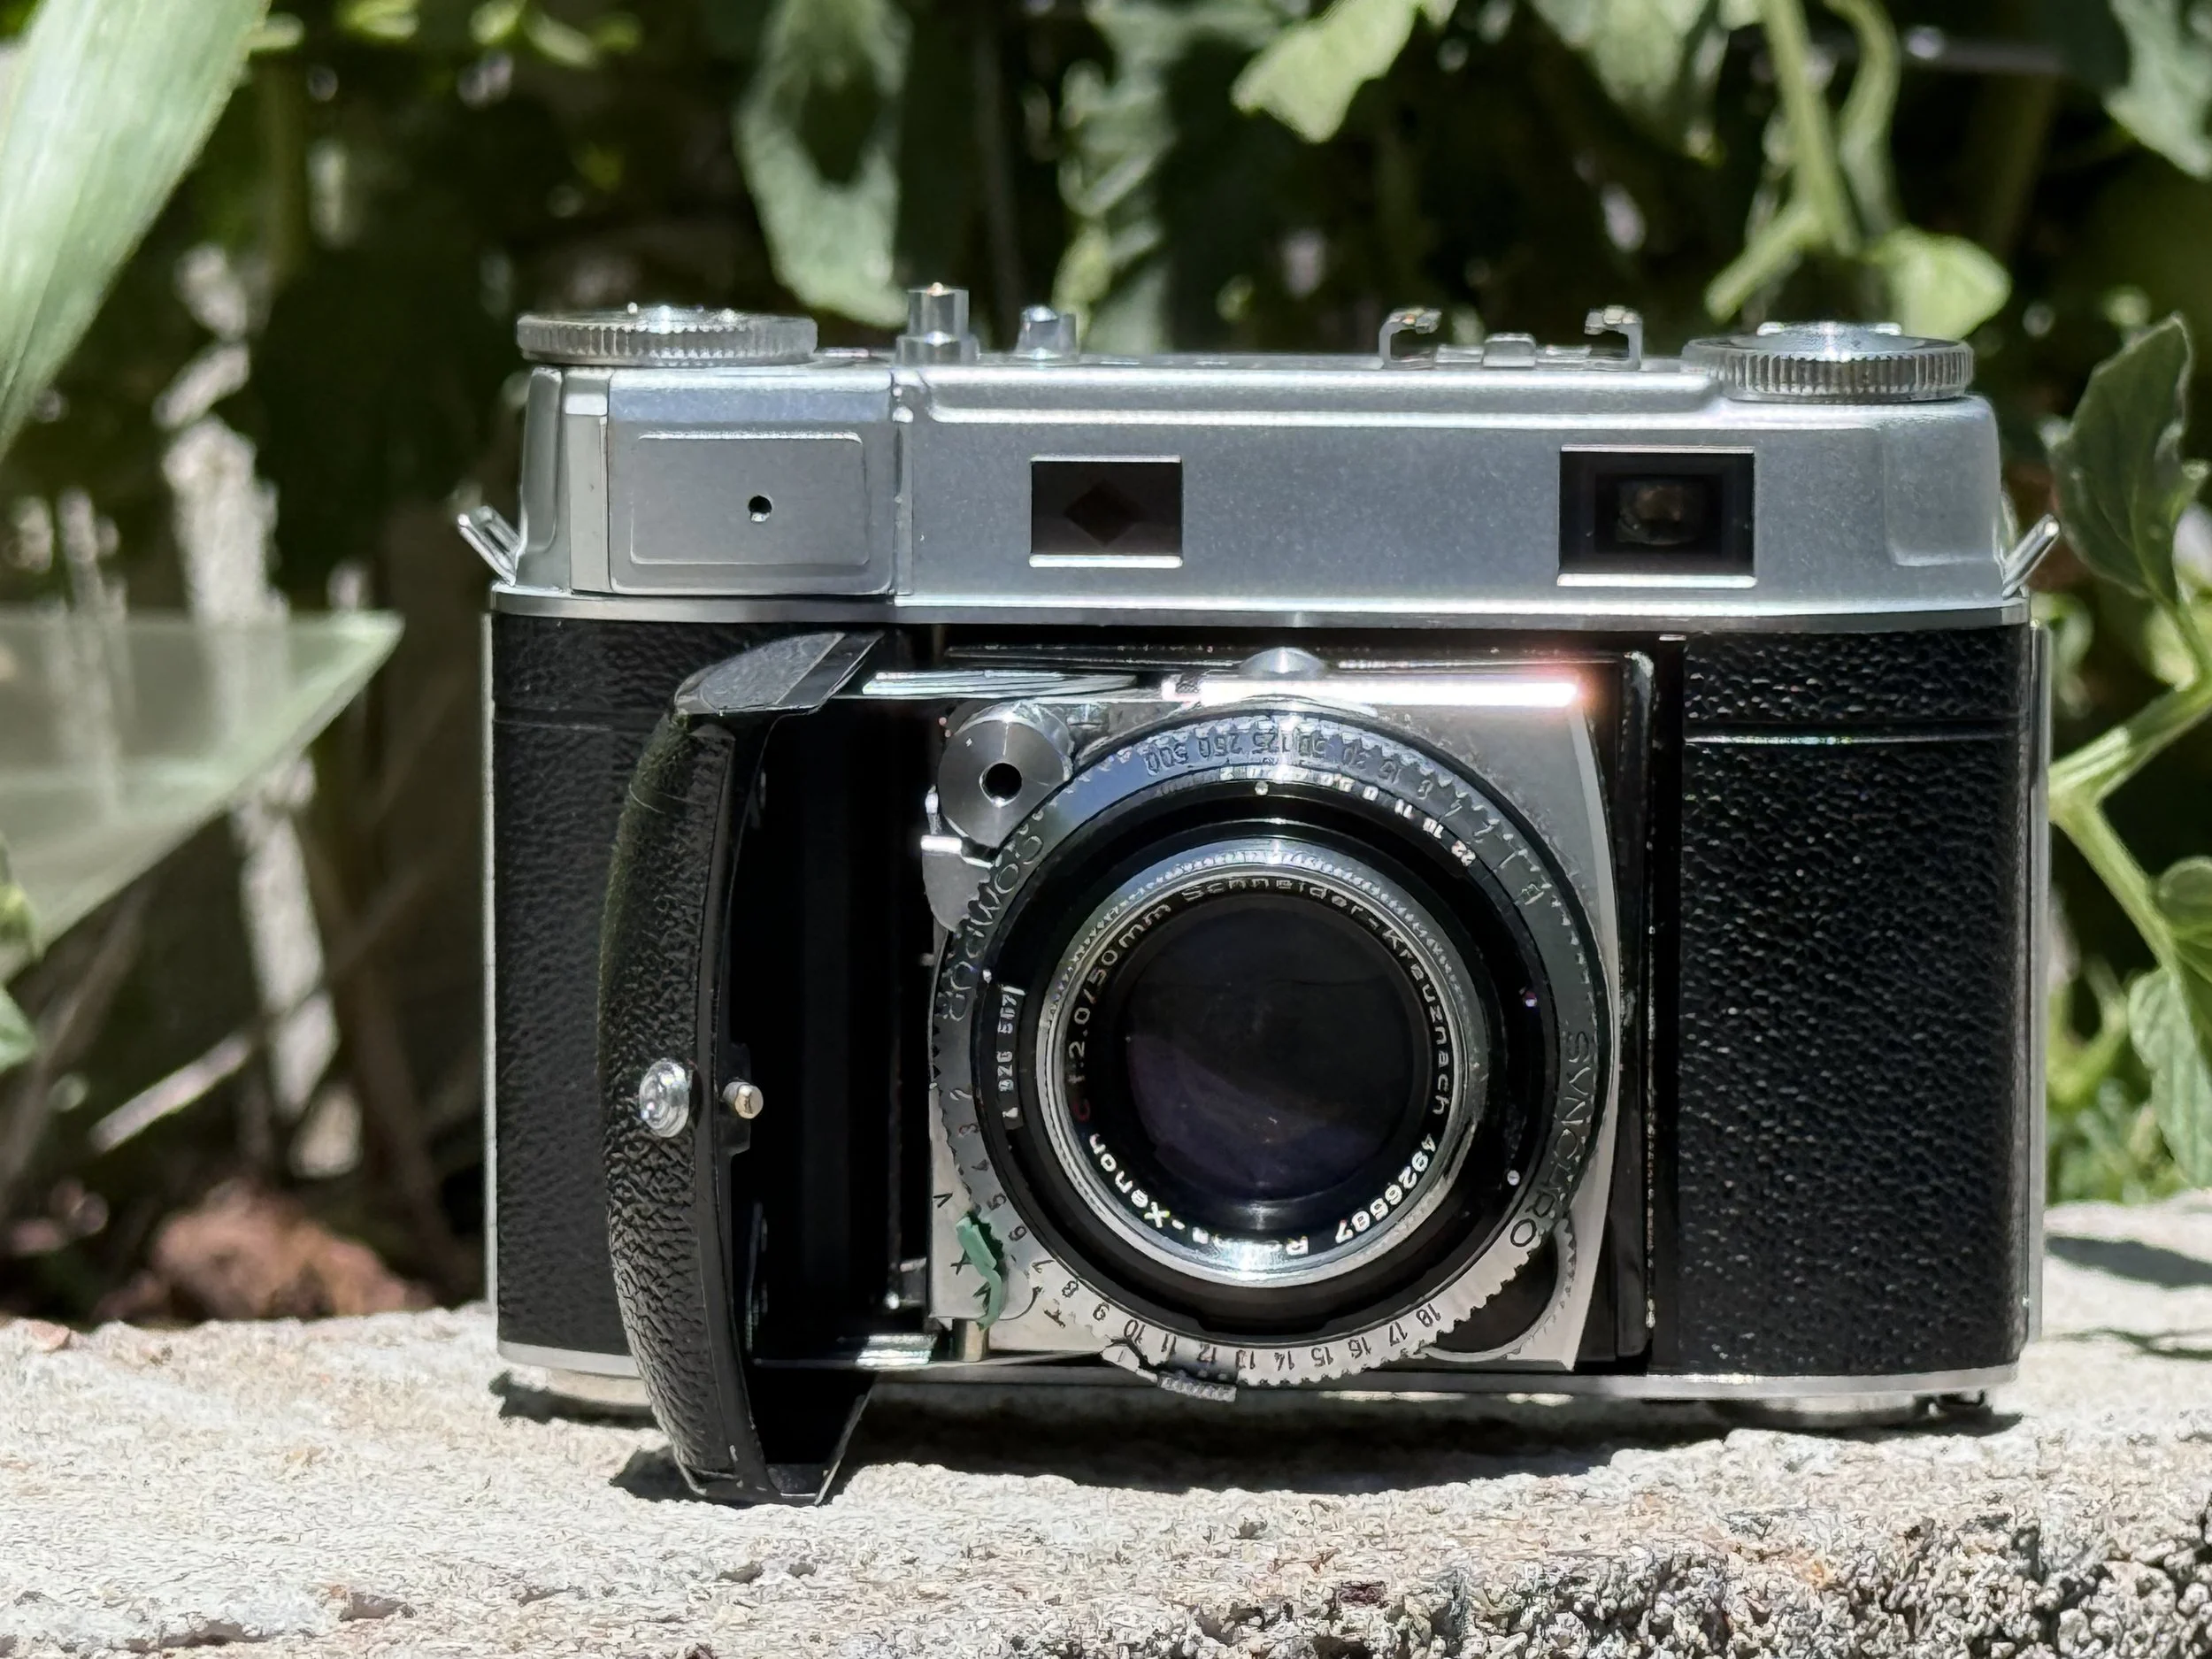
The Kodak Retina IIIc is a remarkable piece of engineering, a camera that was undeniably ahead of its time when it was introduced in the 1950s. Its compact, folding design made it portable, while its high-quality Schneider-Kreuznach lens delivered sharp, vibrant images. The built-in light meter, a rarity for its era, added a layer of convenience that set it apart from many of its contemporaries. But, like any piece of vintage technology, it has its flaws—chief among them, the infamous cocking rack.
The cocking rack is the Achilles’ heel of the Retina series. Models like the IIa, IIc, IIIc, IIIC, and IB are all susceptible to issues with this critical component, which advances the film and cocks the shutter. A faulty cocking rack can render an otherwise excellent camera useless, as I learned the hard way with my first Retina IIIc. For anyone considering purchasing one of these models, my advice is simple. Seek out a camera that has been recently serviced (CLA’d—cleaned, lubricated, and adjusted) or one with a well documented history. If you’re buying on a budget, as I do, be prepared to purchase two cameras to cobble together one fully functional unit. It’s a gamble, but when it pays off, the reward is a camera that’s a joy to shoot with.
One of the standout features of the Retina IIIc, compared to its sibling the IIc, is the inclusion of a light meter. This meter works in conjunction with the camera’s Exposure Value (EV) system, a method of setting exposure that some photographers love and others loathe. For me, it’s a game-changer, especially given my severe visual impairment.
The EV system locks the shutter speed and aperture together based on a single EV number, simplifying the exposure process. Once the EV is set, adjusting one parameter automatically adjusts the other to maintain the correct exposure. For someone like me, who relies heavily on tactile feedback and muscle memory, this system is a blessing. Setting the EV number is straightforward, and from there, it’s just a matter of counting the clicks to dial in the desired shutter speed. What initially seemed like a quirky, outdated system has become one of my favorite features of the Retina IIIc. Like the camera’s bottom-mounted advance lever, it’s a design choice that feels foreign at first but becomes second nature with practice.
The Kodak Retina IIIc is not a perfect camera, but its strengths far outweigh its flaws. Its compact size, exceptional lens, and innovative features make it a standout choice for photographers who appreciate the charm and challenge of vintage gear. Yes, the cocking rack is a persistent issue, and sourcing a reliable example can be a gamble. But when you get it right—whether through careful selection or, in my case, a bit of parts-swapping—the Retina IIIc is a camera that rewards you with every shot.
For me, photography is about more than just capturing images, it’s about the experience, the process, and the stories that unfold along the way. Whether it’s the thrill of unboxing a new-to-me camera, the satisfaction of resurrecting a broken one, or the unexpected conversations sparked by a day at the park, the Retina IIIc has already given me more than I could have hoped for. If you’re willing to embrace its quirks and invest a little patience, this classic camera might just surprise you, too.
What are your thoughts? Are you a Retina skeptic? Let me know what you think in the comments. Photographs are below the article.


Kodak Retina IIIc: A Tale of eBay and Vintage Cameras
The Kodak Retina IIIc is a beautiful piece of photographic history, a folding camera from the 1950s that promises sharp images and a nostalgic shooting experience. With its sleek design, Xenon f/2 lens, and uncoupled light meter, it’s a gem for collectors and film photography enthusiasts like me. However, my journey to acquire a working Retina IIIc has been nothing short of a rollercoaster, filled with anticipation, frustration, and a few hard-learned lessons about buying vintage cameras online that I should have already grasped. Let me take you through my saga, from the thrill of clicking “Bid Now” on eBay to the heartbreak of a broken cocking rack.
The Kodak Retina IIIc is a beautiful piece of photographic history, a folding camera from the 1950s that promises sharp images and a nostalgic shooting experience. With its sleek design, Xenon f/2 lens, and uncoupled light meter, it’s a gem for collectors and film photography enthusiasts like me. However, my journey to acquire a working Retina IIIc has been nothing short of a rollercoaster, filled with anticipation, frustration, and a few hard-learned lessons about buying vintage cameras online that I should have already grasped. Let me take you through my saga, from the thrill of clicking “Bid Now” on eBay to the heartbreak of a broken cocking rack.
It all began about a month ago when I spotted a Kodak Retina IIIc listed on eBay. The listing photos showed a camera in pristine condition, nestled in its original leather case, with a promise of functionality. I was sold. I placed my order and eagerly awaited its arrival, imagining the stunning photographs I’d soon capture with its legendary Xenon f/2 lens, known for its sharpness and beautifully shallow depth of field.
The seller, based in Washington state, opted for USPS’s cheapest ground shipping option. What followed was a logistical nightmare that could only be described as a comedy of errors. The package embarked on a bizarre cross-country journey, starting in Washington, making a pit stop in Portland, Oregon, then heading to Los Angeles, California, before finally landing in Phoenix, Arizona, an hour and a half drive from Payson. Nine days after the order, I was thrilled to see it had arrived in Phoenix. My excitement was short lived.
For reasons unknown, the camera sat in a hot desert distribution center for three days before being inexplicably shipped back to Washington state. I contacted USPS, hoping for clarity, but they were as baffled as I was. “We don’t know why it was sent back,” they told me, offering little comfort. Another week passed before the camera began its return journey to Phoenix. Two more days, and it finally landed in my mailbox three weeks after I’d placed the order. A week’s delay is understandable, but three weeks? That’s enough to test anyone’s patience.
When the package finally arrived, I tore into it with the enthusiasm of a kid on Christmas morning. The camera looked impeccable, still snug in its leather case, with no visible scratches or dents. It appeared to be the pristine specimen promised in the eBay listing. Eager to test it, I cocked the shutter and fired it. The satisfying click of the shutter was music to my ears. I tried it again and nothing. The advance lever refused to budge. My heart sank.
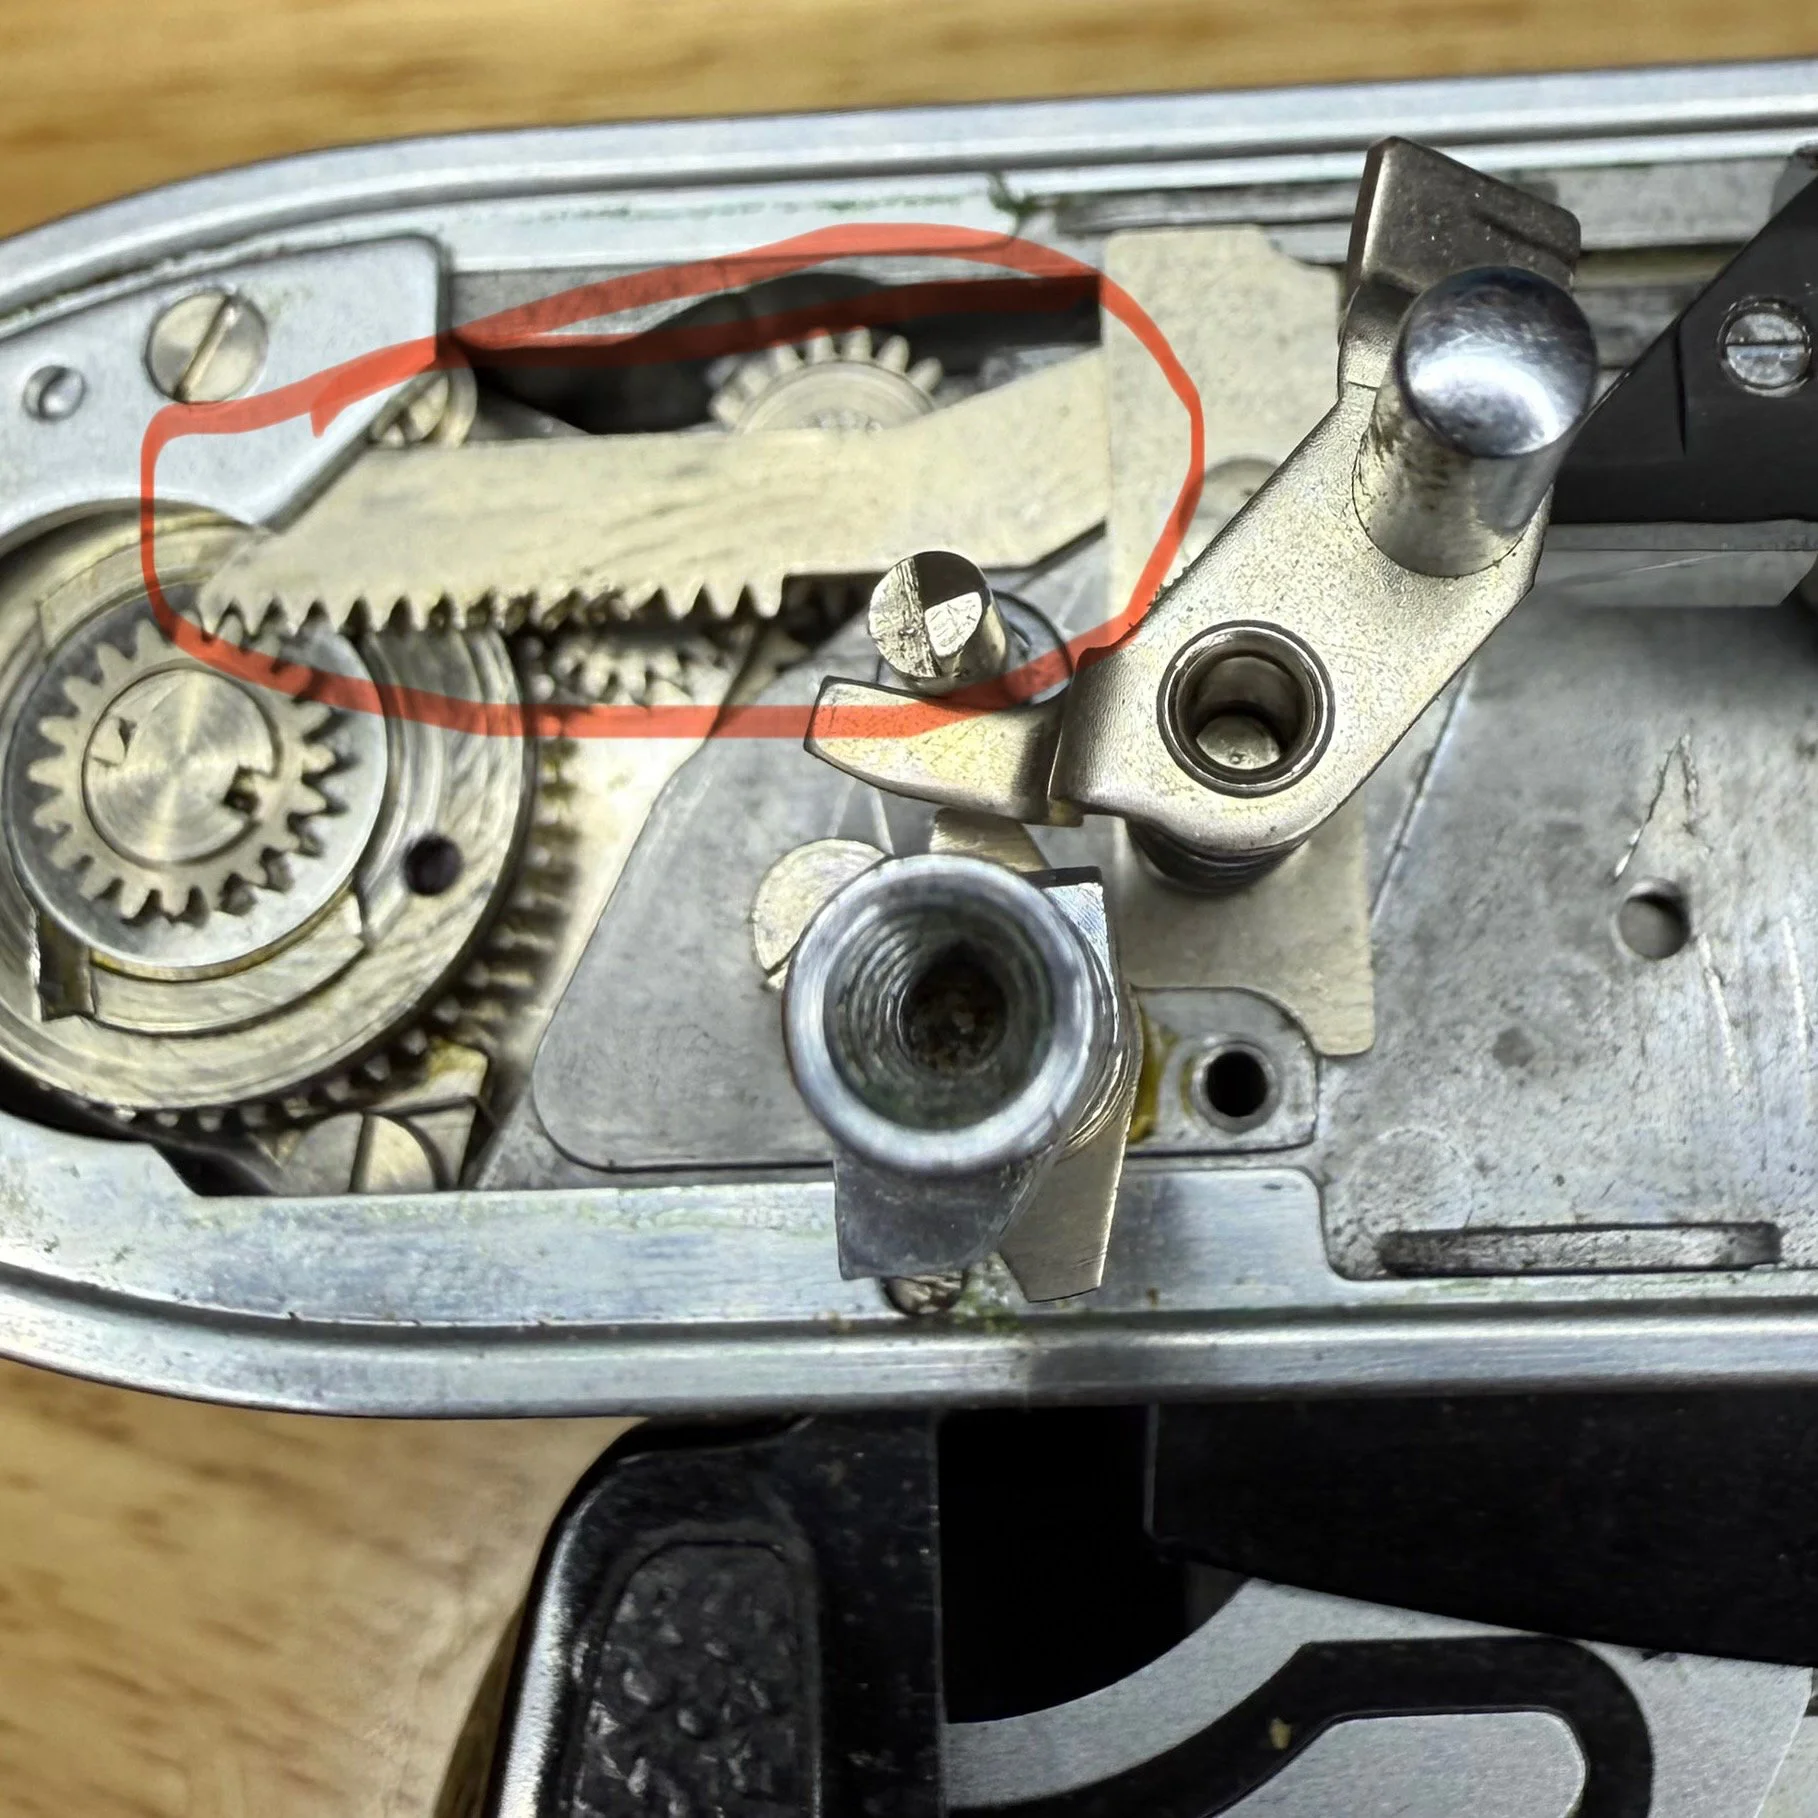
Determined to diagnose the issue, I carefully removed the top cover of the camera. What I found was devastating: the cocking rack, a critical component of the Retina IIIc’s film advance mechanism, was damaged beyond repair. For those unfamiliar, the cocking rack is a delicate part that engages the gears to advance the film and cock the shutter. It’s a testament to the brilliance of the Retina’s engineers, but also its Achilles’ heel.
The Kodak Retina line, produced between 1954 and 1957 for the IIIc model, is a marvel of mid-20th-century engineering. These cameras were ahead of their time, offering compact designs, high-quality lenses, and features like the uncoupled light meter on the IIIc, which I was particularly excited about as a tool for manual exposure calculations. However, the cocking rack is a notorious weak point. From my research and discussions with other collectors, I’ve learned that several factors can lead to its failure.
The most common issue is the guide screw that keeps the cocking rack aligned. Over time, this screw can loosen, allowing the rack to shift and misalign with the gears. This slight movement can wreak havoc on the delicate mechanism, causing irreparable damage. Another frequent culprit is old grease in the shutter mechanism. In colder months, this grease can harden, essentially turning to concrete. If someone forces the advance lever when the shutter is stuck, the rack can be pushed over the gears, bending or breaking it in the process.
There’s also the possibility of human error. The Retina IIIc is over 70 years old, and many have been serviced (or “CLA’d”—cleaned, lubricated, and adjusted) over the decades. An inexperienced technician could mishandle the delicate components, leading to issues like the one I encountered. As someone who’s also over 50, I can sympathize with the Retina IIIc—things start to creak and break down around this age, don’t they?
Despite this setback, my affection for the Kodak Retina IIIc remains unshaken. I already own a Retina IIc, which I adore for its compact size and stellar image quality, but the IIIc offers something extra: that uncoupled light meter. For someone like me, having a built-in meter is a godsend. Plus, the Xenon f/2 lens is a dream, delivering tack-sharp images with a creamy bokeh that’s perfect for portraits or low-light shooting.
The Retina IIIc is a folding camera, meaning the lens retracts into the body when not in use, making it surprisingly portable for its era. It’s a blend of form and function that feels like holding a piece of history in your hands. When it works, it’s a joy to shoot with, offering a tactile, deliberate experience that modern digital cameras can’t replicate.
Faced with a broken cocking rack, I weighed my options. A new old stock (NOS) cocking rack on eBay was listed for $40, but there’s no guarantee it would solve all my problems, and installation requires precision I wasn’t confident I could muster. Instead, I took a leap of faith and ordered another Retina IIIc from a different seller, this time for a bit less than the cost of the replacement part. It’s set to arrive in a few days, and I’m cautiously optimistic (fingers crossed) that it won’t suffer from the same issue.
This isn’t my first rodeo with vintage cameras gone wrong. A few years back, I went through a similar ordeal with a Mamiya Six, buying four of them over the course of a year in hopes of finding one that worked decently. Frustration eventually got the better of me, and I sold them all. I’m determined not to let history repeat itself with the Retina IIIc.
Despite the challenges, there’s something magical about shooting with a camera like the Kodak Retina IIIc. These machines were built in an era when craftsmanship was paramount, and every click of the shutter feels like a connection to the past. The Retina IIIc, with its blend of engineering ingenuity and optical excellence, embodies that spirit. Yes, my first attempt at owning one was a bust, but I’m not giving up. The promise of capturing stunning images with that Xenon f/2 lens keeps me hopeful.
As I wait for my second Retina IIIc to arrive, I’m reminded why I love film photography. It’s not just about the final image, it’s about the journey, the quirks, and the stories that come with these vintage treasures. Here’s hoping my next Retina IIIc will be a keeper. In the meantime, I’ll keep my fingers crossed and my eBay alerts on.
If you’ve got your own tale of vintage camera triumphs or disasters, I’d love to hear it. And if you’re eyeing a Retina IIIc, tread carefully but don’t let my misadventure scare you off. When it works, it’s a camera worth chasing.
Understanding Apertures in Photography
Whether you're capturing moments with a vintage film camera or a modern digital setup, understanding the exposure triangle; aperture, shutter speed, and ISO is fundamental to creating stunning photographs. These three elements work together to control how light interacts with your film or digital camera sensor, ultimately shaping the look and feel of your images. In this guide, we’ll focus on the often-misunderstood role of aperture, exploring not only its impact on exposure but also how it influences depth of field and the creative potential of your photography. While many tutorials emphasize aperture’s effect on brightness, we’ll dive deeper into how it shapes the area in focus, offering practical tips to elevate your skills, whether you’re a beginner or a seasoned photographer.
In this video, I discuss aperture and how it affects depth of field in your photography.
Whether you're capturing moments with a vintage film camera or a modern digital setup, understanding the exposure triangle; aperture, shutter speed, and ISO is fundamental to creating stunning photographs. These three elements work together to control how light interacts with your film or digital camera sensor, ultimately shaping the look and feel of your images. In this guide, we’ll focus on the often-misunderstood role of aperture, exploring not only its impact on exposure but also how it influences depth of field and the creative potential of your photography. While many tutorials emphasize aperture’s effect on brightness, we’ll dive deeper into how it shapes the area in focus, offering practical tips to elevate your skills, whether you’re a beginner or a seasoned photographer.
What is the Exposure Triangle?
The exposure triangle is the foundation of photography, balancing three critical settings to achieve a well-exposed image:
Aperture: Controls the size of the lens opening, affecting both the amount of light entering the camera and the depth of field.
Shutter Speed: Determines how long the camera’s sensor is exposed to light, influencing motion blur and brightness.
ISO: Adjusts the sensor’s sensitivity to light, impacting image brightness and noise levels.
Mastering these elements allows you to manipulate light creatively, ensuring your photos are neither too dark nor too bright while achieving the desired artistic effect. Let’s zoom in on aperture, as it’s one of the most powerful tools for controlling both technical and creative aspects of your images.
Aperture refers to the adjustable opening in your lens through which light/photons pass to reach the the film or scamera sensor. It’s measured in f-stops (f/1.4, f/2.8, f/8, f/11, f/16), where lower numbers indicate a larger opening and higher numbers indicate a smaller one. Aperture plays a dual role: it regulates the amount of light in your exposure and controls the depth of field, which determines how much of your image is in sharp focus.
A smaller number but larger opening aperture (e.g., f/1.8 or f/2.8) allows more light to enter, brightening your image, which is ideal for low light situations like indoor portraits or night photography. Conversely, a higher number but smaller aperture (e.g., f/11 or f/16) lets in less light, making it suitable for bright environments, such as outdoor landscapes on a sunny day. Balancing aperture with shutter speed and ISO ensures your image achieves the desired brightness without over or underexposure.
While aperture’s effect on exposure is widely discussed, its influence on depth of field is equally important and often not mentioned. Depth of field (DoF) refers to the range within your image that appears sharp and in focus. Aperture settings directly control this range, allowing you to create everything from dreamy, blurred backgrounds to crisp, detailed scenes.
Wide Aperture (Low f-stop, e.g., f/1.4 or f/2.8): A wide aperture creates a shallow depth of field, where only a small portion of the image is in focus, and the background blurs into a creamy bokeh. This is perfect for portrait photography, where you want to isolate your subject from the background, or for macro photography, emphasizing fine details. For example, with a 50mm lens set to f/2.8, the depth of field might be just a few inches when focusing on a subject a few feet away, making the subject’s eyes sharp while the background melts into beautiful bokeh.
Narrow Aperture (High f-stop, e.g., f/11 or f/16): A smaller aperture increases the depth of field, bringing more of the scene into focus. This is ideal for landscape photography, where you want both the foreground and distant mountains to be sharp, or for group shots, where everyone needs to be in focus. However, smaller apertures require more light or adjustments to shutter speed and ISO to maintain proper exposure.
While aperture is the primary driver of depth of field, other factors also play a role:
Focal Length: Longer lenses (e.g., 85mm or 200mm) produce a shallower depth of field compared to shorter lenses (e.g., 24mm or 35mm) at the same aperture. For instance, a 50mm lens at f/2.8 will have a narrower depth of field than a 24mm lens at f/2.8.
Subject Distance: The closer your subject is to the camera, the shallower the depth of field becomes. For example, photographing a flower a few inches away at f/2.8 will result in a very narrow focus plane, while the same aperture used for a subject 10 feet away will yield a slightly deeper focus area.
Lens Design: Different lenses have unique optical characteristics that affect depth of field. Prime lenses with wide maximum apertures (e.g., f/1.4 or f/1.8) are prized for their ability to create dramatic bokeh, while zoom lenses may offer more flexibility but less pronounced background blur.
Practical Tips for Using Aperture Creatively
Experiment with Portraits: Try shooting a portrait at f/1.8 to create a beautifully blurred background that makes your subject pop. Then, switch to f/8 and notice how more of the background comes into focus. Compare the results to understand aperture’s creative impact.
Master Landscape Photography: For sweeping vistas, use a narrow aperture like f/11 or f/16 to ensure both foreground and background details are sharp. Use a tripod if the smaller aperture requires a slower shutter speed to avoid camera shake.
Control Light in Low-Light Settings: In dim environments, a wide aperture (e.g., f/2.8 or lower) can help you capture well-exposed images without relying heavily on high ISO settings, which can introduce noise.
Understand Your Lens: Not all lenses perform equally at every aperture. Some lenses are sharpest at mid-range apertures (e.g., f/5.6 or f/8), while others excel wide open. Test your lens to find its “sweet spot” for optimal sharpness and clarity.
Balance the Exposure Triangle: Adjusting aperture affects the other elements of the exposure triangle. For example, using a wide aperture in bright light may require a faster shutter speed or lower ISO to prevent overexposure. Practice balancing these settings to achieve your desired look.
Mastering aperture is a game-changer for photographers, whether you’re shooting on a vintage film camera or a cutting-edge digital model. By understanding how aperture affects both exposure and depth of field, you can make intentional choices to bring your creative vision to life. Experiment with different f-stops, observe how they transform your images, and practice balancing aperture with shutter speed and ISO. Over time, you’ll develop an intuitive sense of how to use the exposure triangle to capture the perfect shot in any scenario.
For a hands-on demonstration, check out our accompanying instructional video, where we break down aperture settings using a 50mm lens and show real-world examples of how f/2.8 versus f/11 changes your images. Start experimenting today, and watch your photography skills soar!
Difference between the Voigtlander Vitos
In this engaging YouTube short, we take a closer look at the fascinating differences between the Voigtländer Vito I models from the pre-WWII era, the Vito I models released after WWII, as well as the updated Voigtländer Vito II and Vito IIa versions. Join us as we explore the unique features, design elements, and the historical significance of each camera, providing you with a comprehensive understanding of these classic gems in the world of photography!
Zeiss Ikon Super Ikonta 531/2
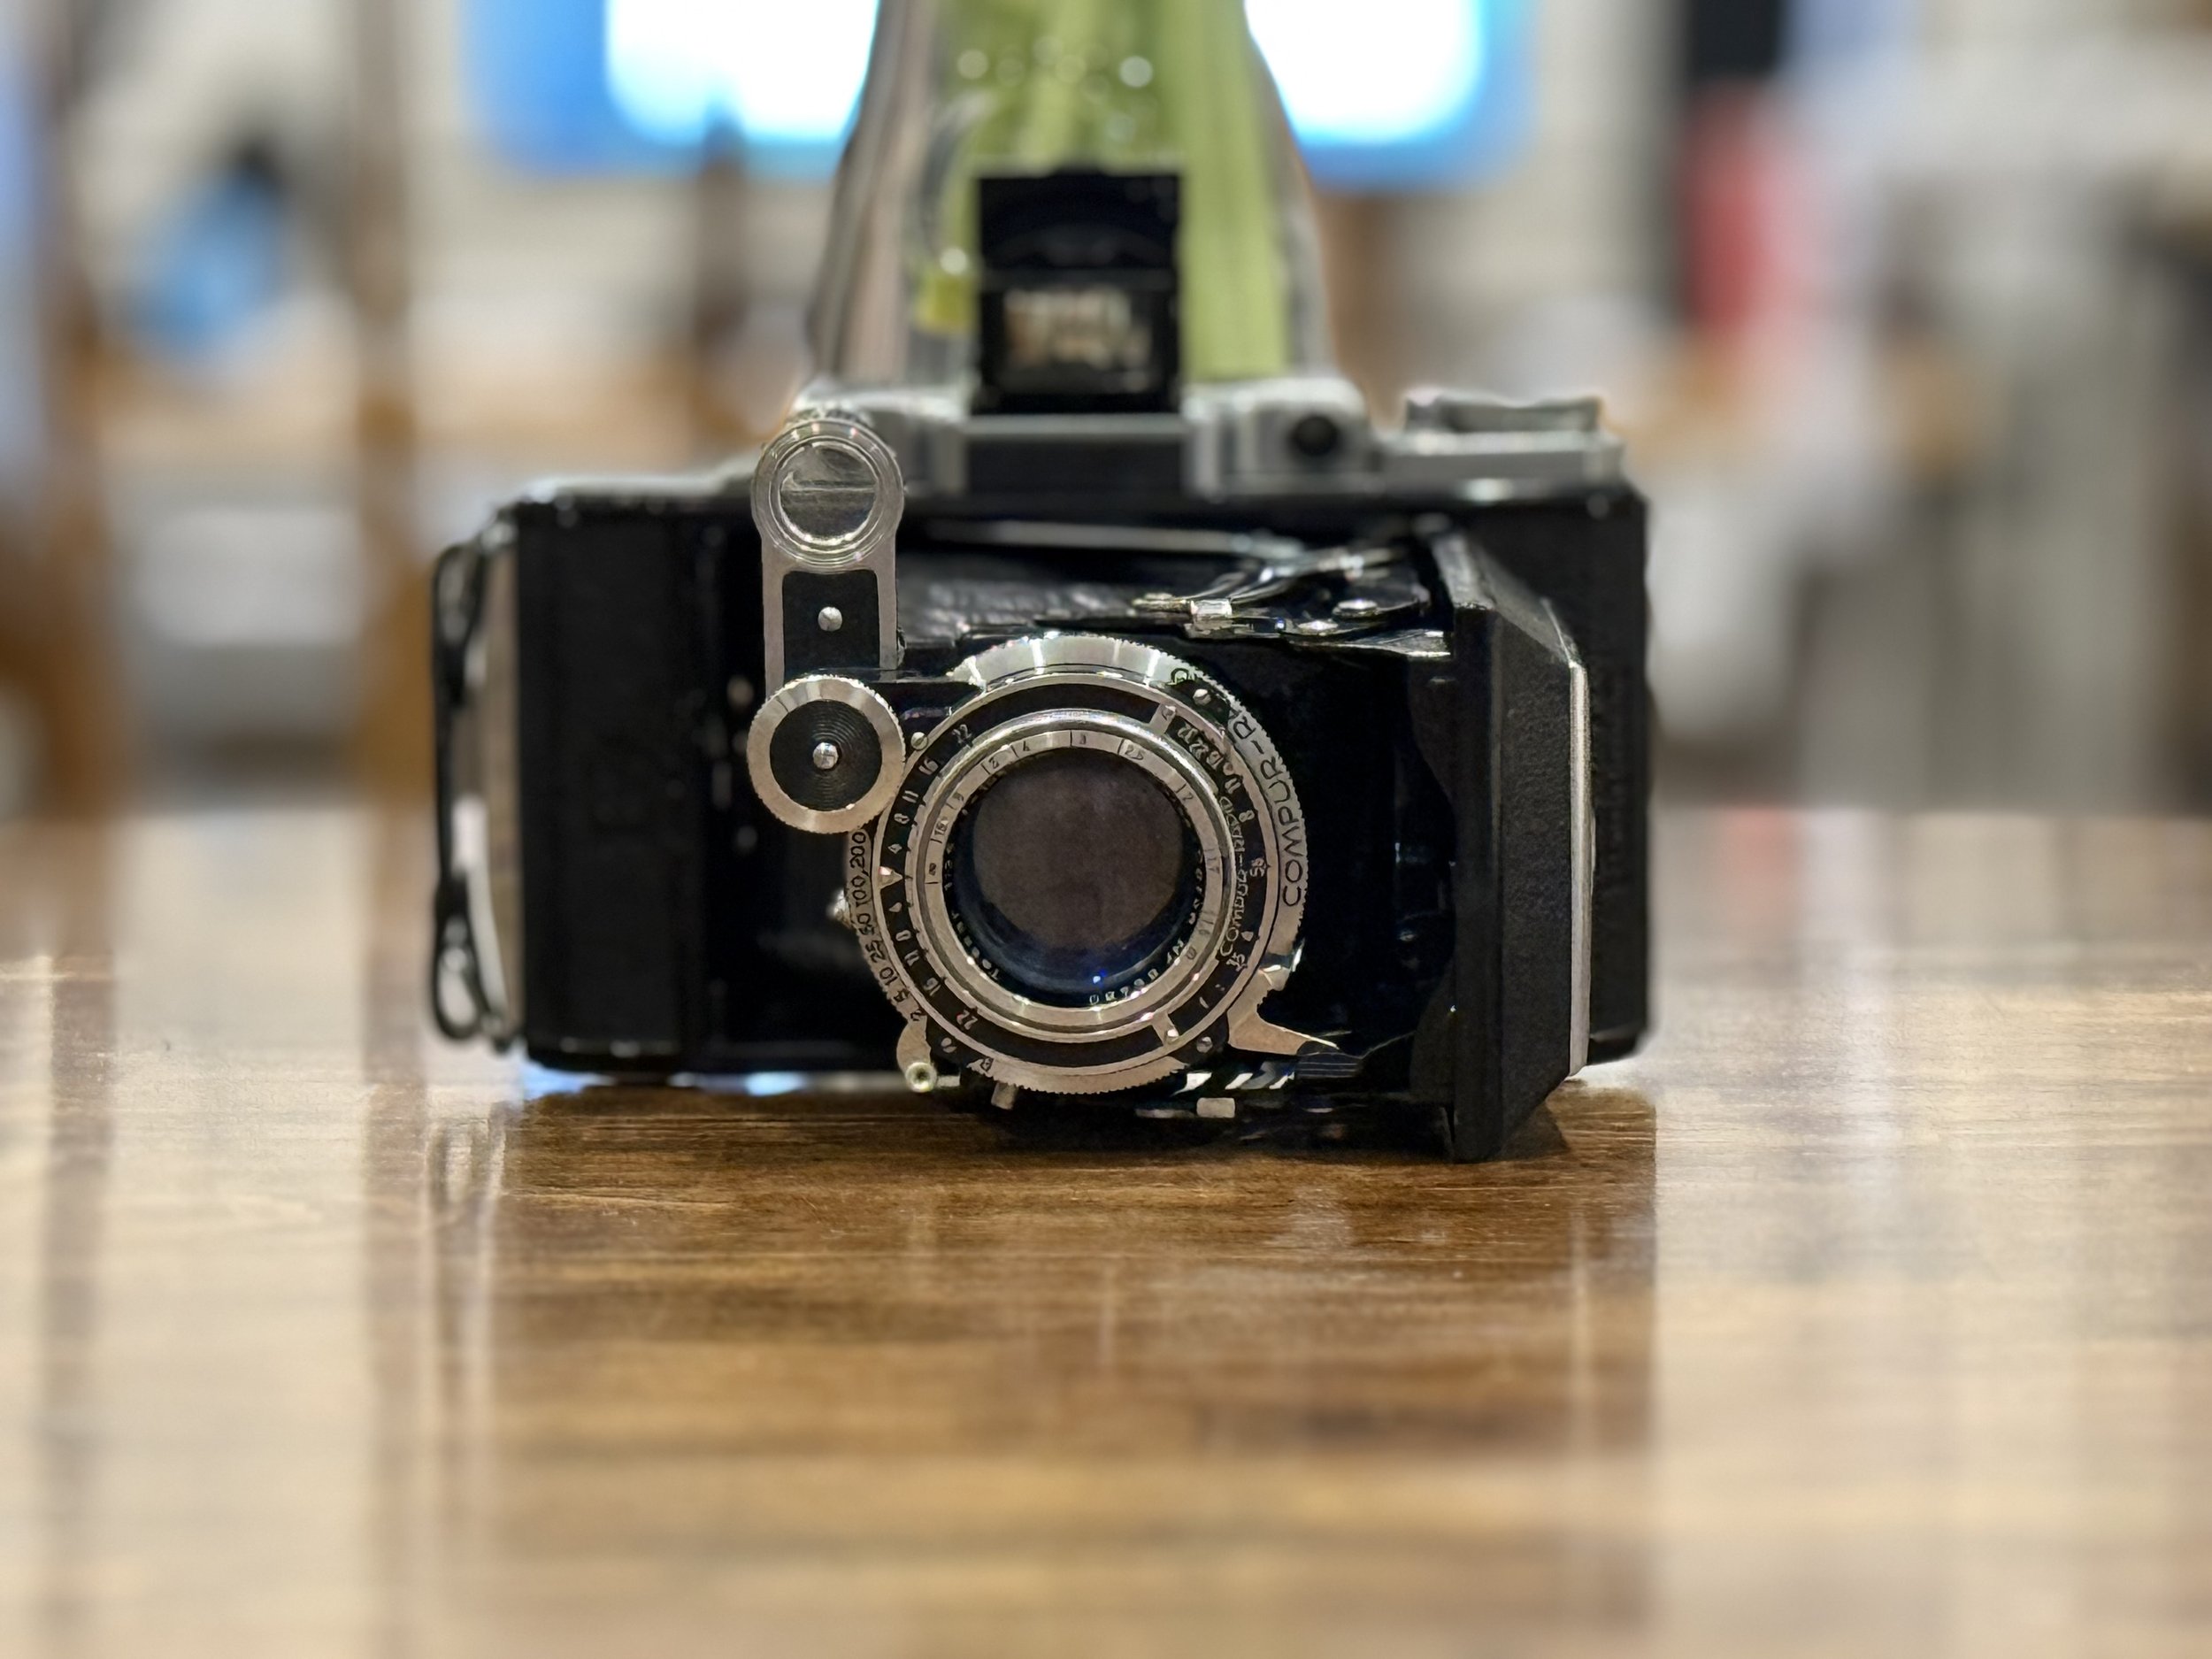
It is rare these days to find a gem for the price of a rock on eBay. About a month ago, I put in a low bid for a Super Ikonta more for a laugh than anything else. The starting bid was $10 for this beautiful piece of German engineering. I threw out a small bid of $20 just to see what happened. About a week went by and I forgot about it, but by a sheer miracle, I won this beautiful camera that was manufactured in West Germany between 1949 and 1950, according to the serial number.
When the camera arrived, a Zeiss Ikon Super Ikonta 531/2, it was in amazing condition. The 105mm f/3.5 Tessar lens was clean. The Compur-Rapid shutter operated smoothly and the times were perfect. And amazingly, the focusing lens travelled buttery smooth with the right amount of friction as to be just a tiny bit stiff. I have dreamt for years about having a Super Ikonta. Even though I prefer 6x6 or 6x4.5 frame sizes, I do like the 6x9 format, even though it does eat up a ton of film! One roll of 120 film in this camera will get you 8 shots! With today’s prices on film, that is not a lot. These cameras originally came with a 6x4.5cm mask. If any of you know where I can get one of these for a decent price, please let me know.
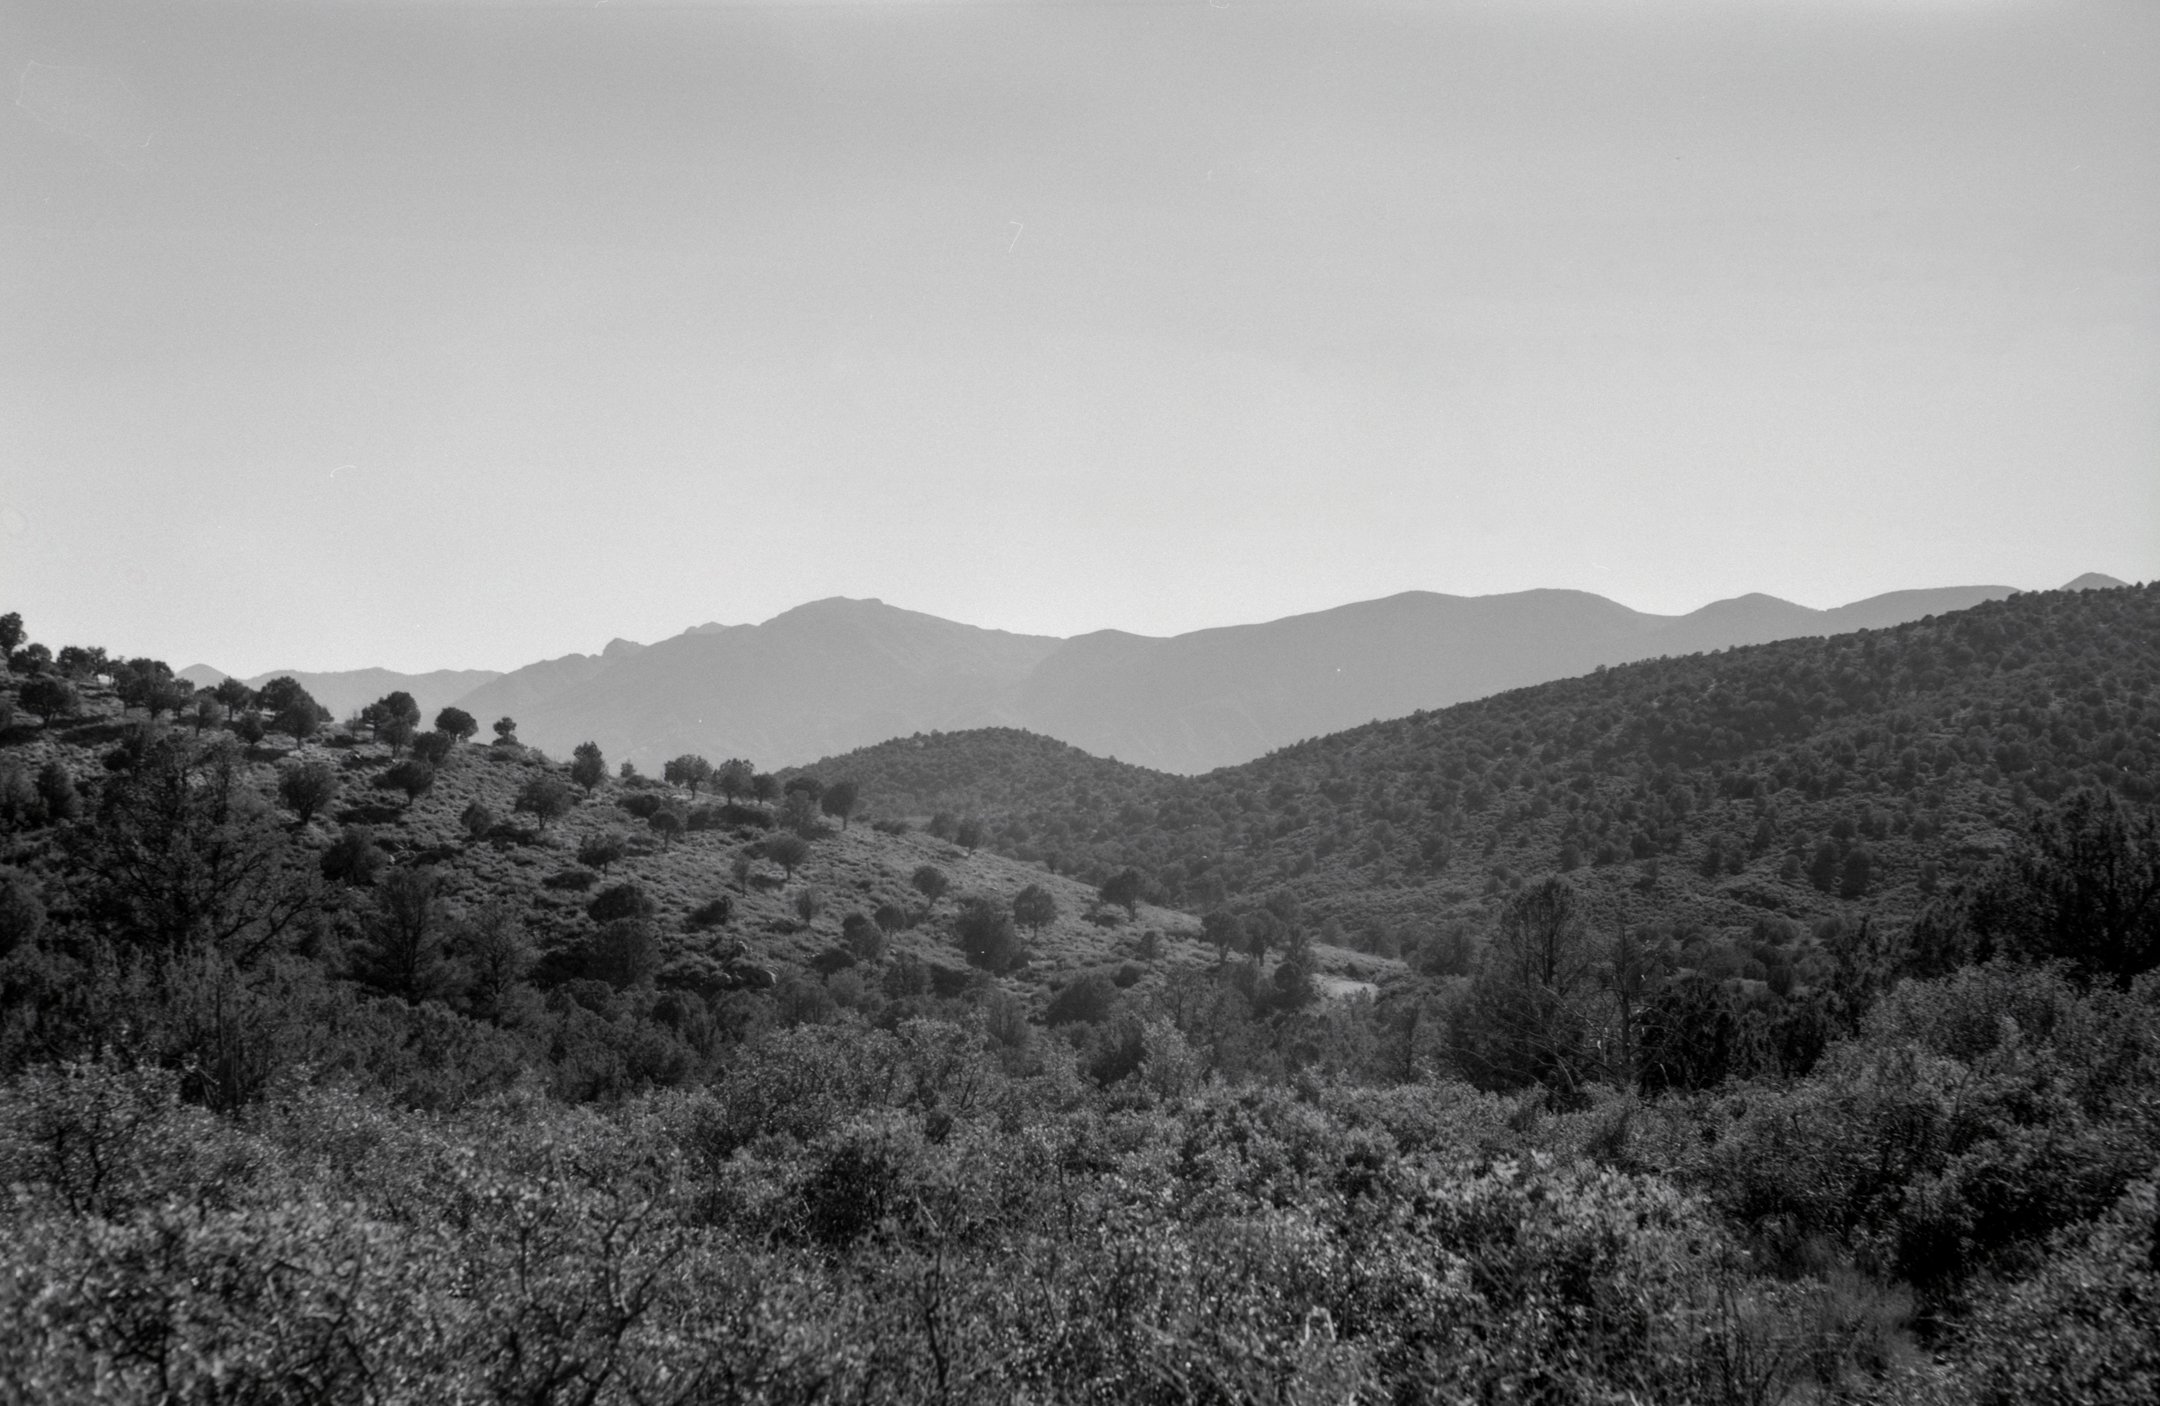
Due to this camera arriving so clean, I did some minimal cleaning and took it out for a test shoot. I took it out on the Peach Orchard Loop Trail that I’ve discussed before. It performed flawlessly. It was not the best time of day or season, but the detail captured in the large 6x9cm photograph blew my mind. I had a small issue with an old batch of 510Pyro during development, but the photographs still turned out well.
I look forward to using it again in the future. However, the use case for a wide format medium format camera is limited. I do landscapes, but as expensive as film is, I will have to be picky about when I use it. I still can’t believe I actually have one of these cameras. This model sells regularly on eBay for $249.
Below, you’ll discover photographs of the camera and the photographs it took. When I use it in the future, I will update this blog post.


Favorite Medium Format Camera of 2024
A short review of the budget friendly medium format film camera with sample photographs.
In my previous post, I enthusiastically discussed my preferred 35mm film camera for 2024. However, I should have clarified that I was specifically referring to my favorite 35mm film camera of 2024. Today, I will shift gears and provide a detailed analysis of my favorite medium format film camera for 2024. What criteria led me to select this particular camera?
There are several important components to consider when picking out a favorite camera for an entire year of photography adventures. In my wee opinion, it absolutely has to be a camera that a person has put many rolls of film through over countless creative sessions. Additionally, and perhaps most importantly, you need to truly enjoy using it. The camera must seamlessly become a part of you, almost like an extension of your own self, and you need to take the time to understand all of its wonderful quirks and genuinely appreciate them, as they often contribute to the magic of capturing unforgettable moments.
Every camera has quirks. This camera has a few, such as the slower top shutter speed, but the ease of use and versatility make up for it. I am referring to the Agfa Isolette I. This camera is an amazing medium format camera for the money. It is a standard 6x6 folding camera with an Agnar 85mm f/4.5. It modern times, that aperture seems slow and small, but it was great for its time. These can be purchased on eBay for around $20-$50 in decent condition. I’ve had three of these and never had a problem with the bellows or light leaks.
When shooting with these folders, I’m usually in bright sunlight and shooting at f/8, so the slow 1/200th of a second shutter speed isn’t that bad. It is fast enough. Below, I’ll have a few sample that I took with this camera. One thing to be careful of is double exposing (exposing the same frame of film twice). There is no safety, so you have to remember to wind to the next frame. My cheat for this is to go ahead and wind to the next frame as soon I take a shot. I still do it on occasion.
This camera purchase was pure luck, really. I decided to put in a bid of just $10, thinking it was a fun experiment, and a few days later, I was pleasantly surprised when I received the notification that I had won the auction. Not only did I win the camera, which turned out to be in fantastic condition, but I also scored a case and a little rangefinder tucked away in its own pouch! As I examined the photos of the ad, I noticed the rangefinder pouch attached to the case strap and immediately recognized exactly what it was. I took a chance and ultimately secured a wonderfully charming little camera and rangefinder duo. Together, they are an absolute joy to use, and I can’t imagine my photography adventures without them. Without a rangefinder, it would undoubtedly be a significant struggle to accurately guess the distance with my limited vision.
Keep all of this in mind when looking at these cameras. They do not have a rangefinder or a light meter built in, so you either have to have really good eyes to accurately estimate distance and a light meter or only use it at infinity. Agfa/Ansco are, for the most part, one and the same. The 50’s.and 60’s cameras were of great quality for the price. The Agfa/Ansco that survived into the 70’s was of lesser quality, in my wee opinion.
The main point of all of these posts is to encourage you, the reader, to get out there and shoot stunning photographs, whether it is with a classic 35mm camera, a versatile medium format, or a large format. Photography is an adventure waiting to be explored! If you have any questions, comments, or thoughts about any of these articles and reviews that I create, please feel free to reach out and use the contact page. I’d love to hear from you and help in any way I can!


